
Install a mud flap only after its mounting face sits against the arch and every specified fixing lines up without pulling the panel into place. Then fit the exact fasteners in the kit instructions and use their tightening specification. A screw that turns, or a flap that looks straight, is not enough to establish a sound installation.
These checks help you prepare a vehicle-specific BYD kit and recognise a mismatch. They are not a substitute for its hole map, fastener allocation or vehicle lifting procedure.
Start with a usable installation plan
Lay out the pieces for the supplied corners using the kit’s markings or instructions. Beside them, identify which original fasteners are retained, which are replaced, and whether any supplied screw needs a separate grommet, clip nut or bracket behind the panel. Keep removed hardware labelled by its original position.
If the instructions do not identify those connections, resolve that before taking the arch apart. Marvix supplies an installation video tutorial after purchase; use the tutorial for your particular set, together with the vehicle’s requirements. A photograph of a bag of screws does not establish their allocation.
Park securely on level ground and switch the vehicle off as its manual directs. Only work where the fixings can be accessed safely. If wheel removal or lifting is required, use the vehicle’s model-specific procedure and suitable equipment, or have a workshop fit the kit. Turning the steering may improve access on some cars; it is not proof that every fixing is reachable with the wheel on.
Read the joint in the installation photographs
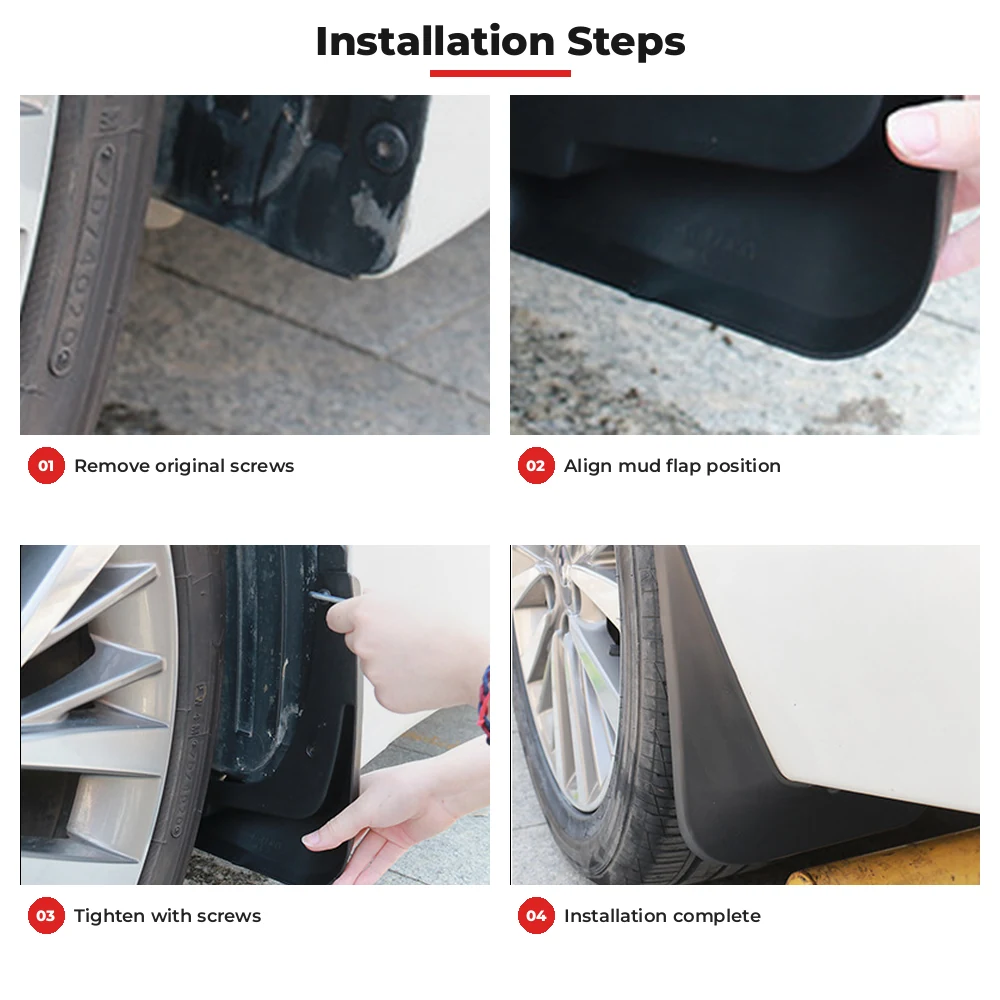
The Seal product listing specifies a four-piece set with screws and original mounting positions. In the reference sequence, the part is positioned against the arch before it is secured. Use that as an alignment check—not as a reason to copy the screw count, screw length or removal order onto another BYD model.
At each fixing, distinguish the flap’s clearance hole from the receiving part behind it. A screw passing through two aligned holes still needs the specified receiver to form the connection. If the backing clip is missing, tightening the screw cannot replace it.
Dry-fit before removing more hardware
- Clean and inspect the contact face. Remove loose grit so you can see whether the flap rests against the intended surface. A cracked liner lip or detached original guard needs attention before it carries another part.
- Offer up the correct corner piece. Support it in the position shown by the kit instructions. Check the contour at the top and along the arch; do not use a screw to drag a proud edge into place.
- Check all specified fixing positions together. One matching hole is not sufficient. If another sits beyond the original hole or the panel must twist, recheck the part identification, orientation and vehicle version.
- Account for the added layer. Flap plus liner is a thicker stack than liner alone. Confirm that the specified replacement clip or screw is intended for that joint; do not assume every original fastener can be reused.
For an expanding push rivet, the centre pin and outer sleeve have separate jobs. Tesla’s documented push-clip sequence shows the open clip being inserted through aligned holes before the pin is pushed in to lock it. That illustrates the mechanism; it does not specify the clip for a BYD.
Fasten without improvising the specification
Use the kit’s fastener order and specified torque where given, including any separate requirements for original vehicle fasteners. A screw engaging threads, a bolt entering a clip nut and a plastic push rivet are different connections. There is no shared “mud flap torque” based on the softness of the visible panel.
Stop if a screw spins without clamping, a receiver turns behind the liner, the plastic pulls into a dish, or a mounting point cracks. More turns, a bigger screw or adhesive on the threads do not identify what has failed.
“No-drill” should mean the installation does not require new holes. Check the full instructions for any other irreversible operation, such as cutting or removing a cover; no drilling does not necessarily mean no modification. Do not drill the car to rescue a mismatched model-specific set.
Check before the vehicle moves
Once assembled to specification, confirm that each intended fixing is present and the flap remains seated against its mounting face. Check the front tyre-to-flap space through the steering positions required by the instructions, with nobody’s hands in the moving wheel’s path.
Static clearance is only a preliminary check. Queensland’s current inspection manual rejects wheel or tyre fouling through the full range of travel. A modified wheel or suspension setup needs the corresponding clearance assessment; bouncing the body or driving over a speed bump is not proof of full-travel clearance.
If the tyre touches the flap, or the panel can detach, do not use a road test to see whether it wears clear. Correct the fit or have the installation inspected first. Keep the kit identity, the fixing layout and any unresolved contact point together when handing it to the installer.


 English
 Portuguese
 French
 Turkish
 Russian
 Arabic
 Spanish