

Installing a BYD Atto 2 frunk storage box takes ten steps: release the rear cover retainers and outer clips, lift out the trim panels, remove four factory screws, seat and fix the box, then refit the screws, retainers and panels. No drilling is shown. This guide covers the Marvix LHD box, with a photo for every step.
It is written for owners who like to do their own fitting, and for workshops and accessory shops that fit boxes for customers. If you are still deciding whether the Atto 2 has a frunk at all, start with Does the BYD Atto 2 have a frunk?.
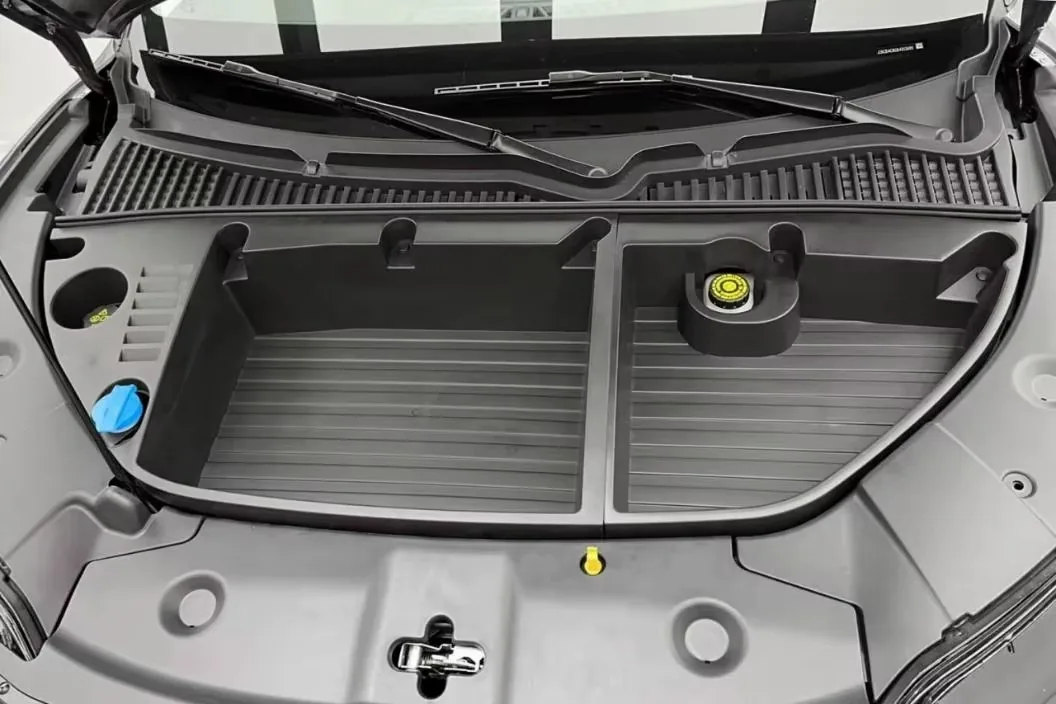
Before You Start
This box is for the BYD Atto 2 in left-hand-drive form. Fitting it means removing part of the factory trim around the front compartment. Compare the box and its mounting holes with your car. If anything looks different from the photos below, send us pictures of your open bonnet and we will check with you before you pick up a tool.
Tools and preparation
- A plastic trim removal tool.
- The driver or socket that fits the fasteners shown in the photos.
- A small tray for clips and screws.
- A clean cloth to protect painted edges.
Keep the hardware supplied with the box separate from the car’s original screws so the two do not get mixed up. Do not swap in longer screws, and do not force a fastener that will not start smoothly.
Checklist
- Park on level ground, switch the car off and secure it against rolling.
- Open the bonnet fully and make sure it is properly supported.
- Let any hot parts cool down.
- Keep tools, hands and loose items away from moving or electrical parts, and do not touch any high-voltage components or wiring.
- Stop if you find damaged wiring, a loose connector or a panel that seems to cover electrical equipment, and ask a qualified technician.
- If a panel or clip does not release with light, even pressure, stop and check.
BYD Atto 2 Frunk Installation: 10 Steps
The photos show each step on an Atto 2. Use your own box’s mounting points as the reference.
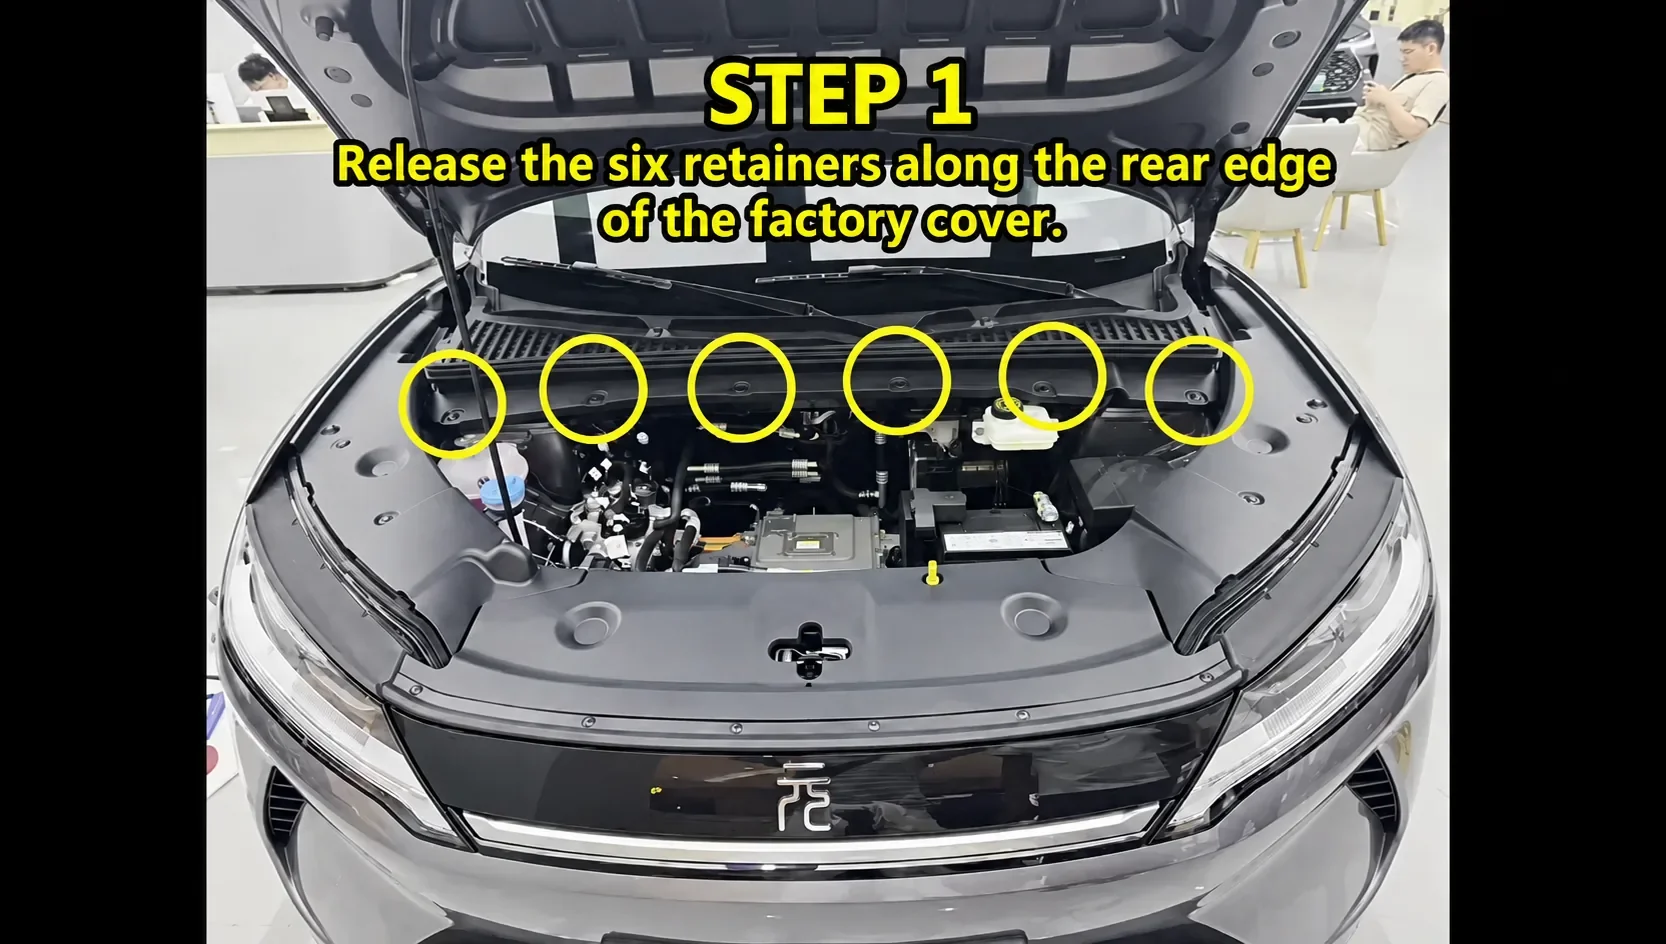
Step 1: Release the six rear cover retainers
Open the bonnet fully and support it. At the windscreen end of the front compartment you will see six retainers along the rear edge of the factory cover. Release each one with a trim tool or driver that suits its design. Keep them together and remember where each came from. Do not pry against the glass, and do not pull up on the panel while a retainer is still holding it.
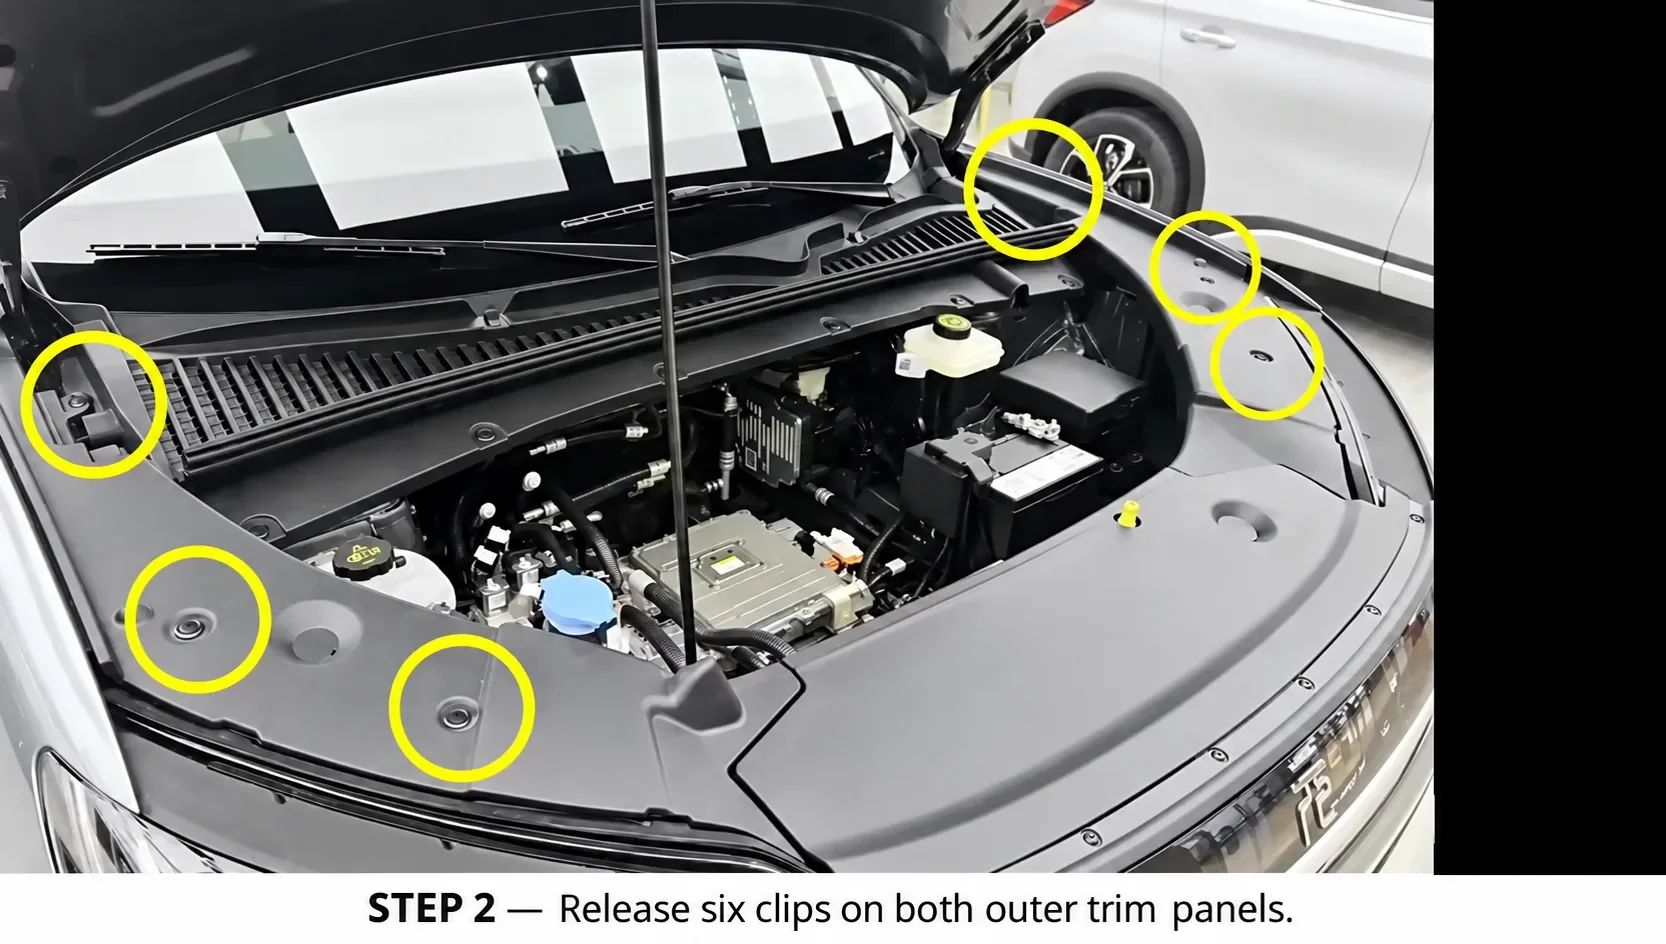
Step 2: Release the outer trim clips
Along the left and right outer trim panels there are six clip positions. Work from one edge at a time, supporting the panel as each clip lets go. If a clip stays in the body, ease it out and return it to the panel so it is ready for refitting. Replace any clip that is cracked or deformed.
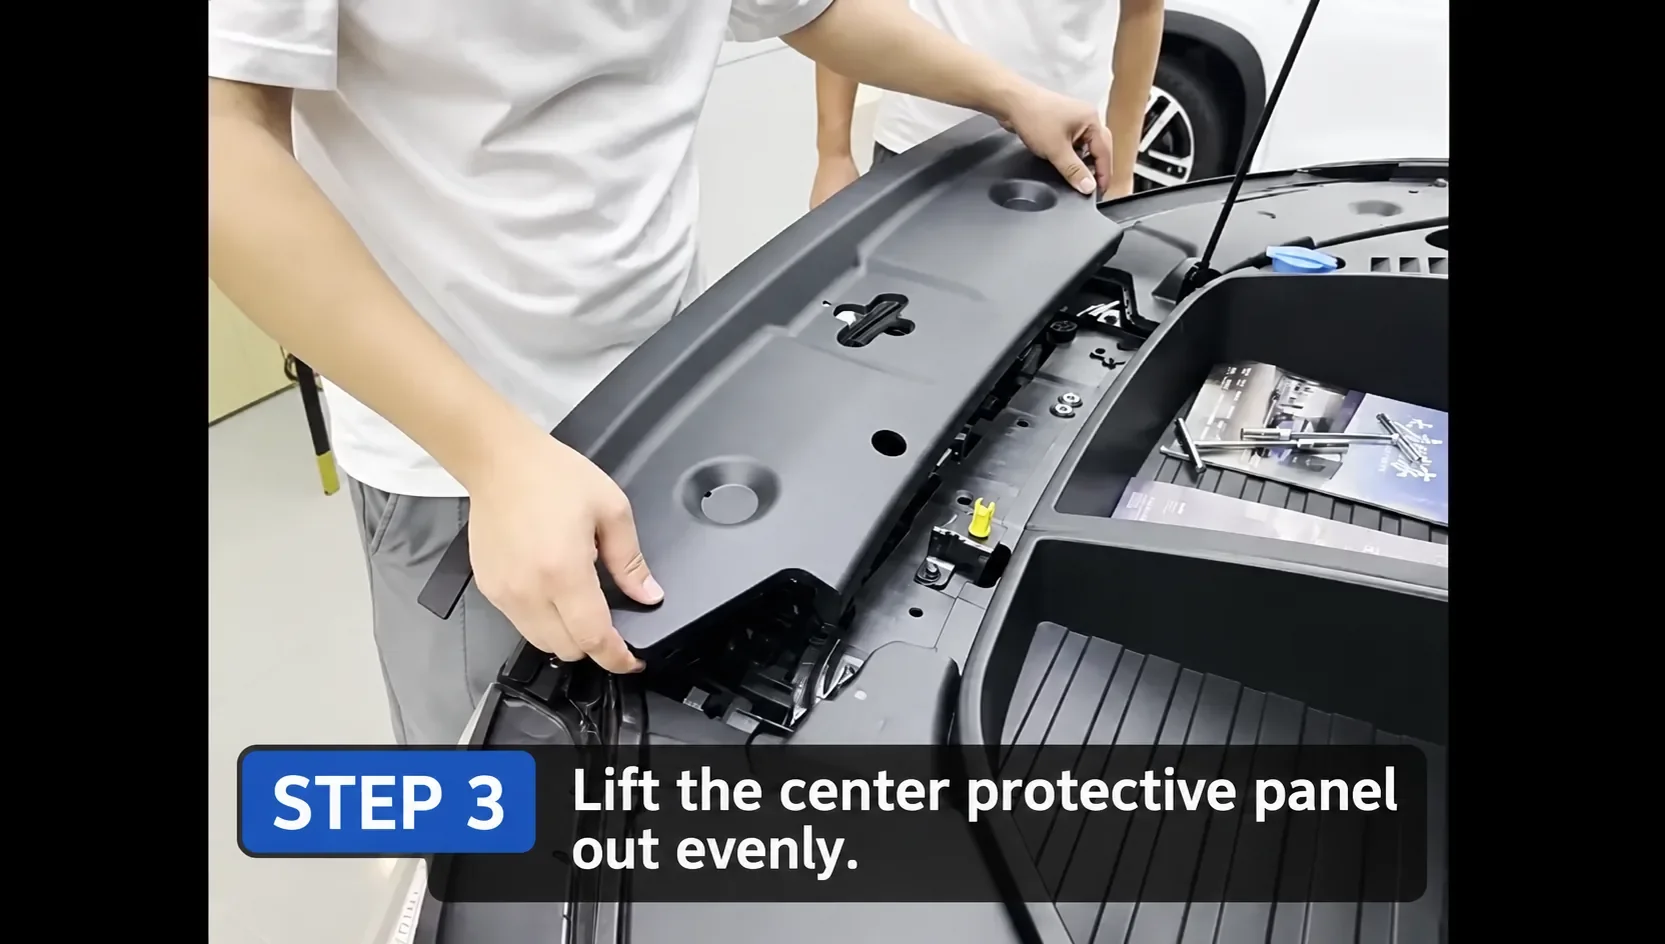
Step 3: Lift out the centre protective panel
With the retaining points released, lift the centre panel straight up and out. Keep it level so its tabs do not catch on neighbouring trim. Put it down on a clean surface with its clips facing up and do not rest weight on its edges.
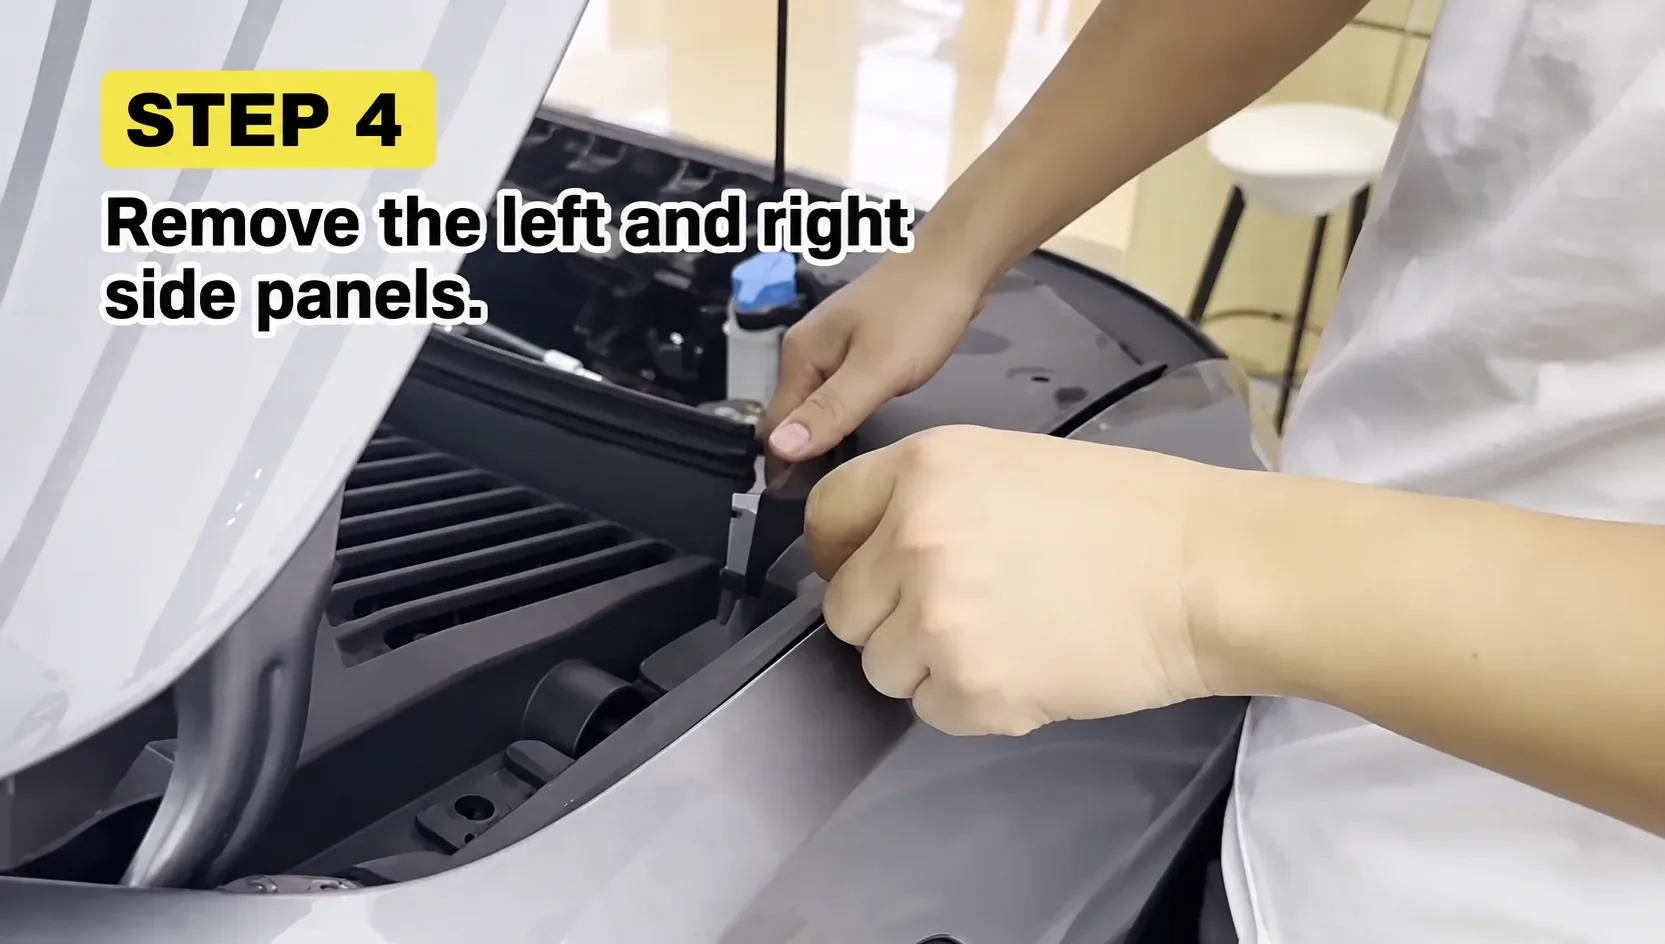
Step 4: Remove the left and right side panels
Take out the two side panels shown. Check for any fastener still holding each one before you lift it away. If the two panels look alike, label left and right, and store them where they will not get scratched.
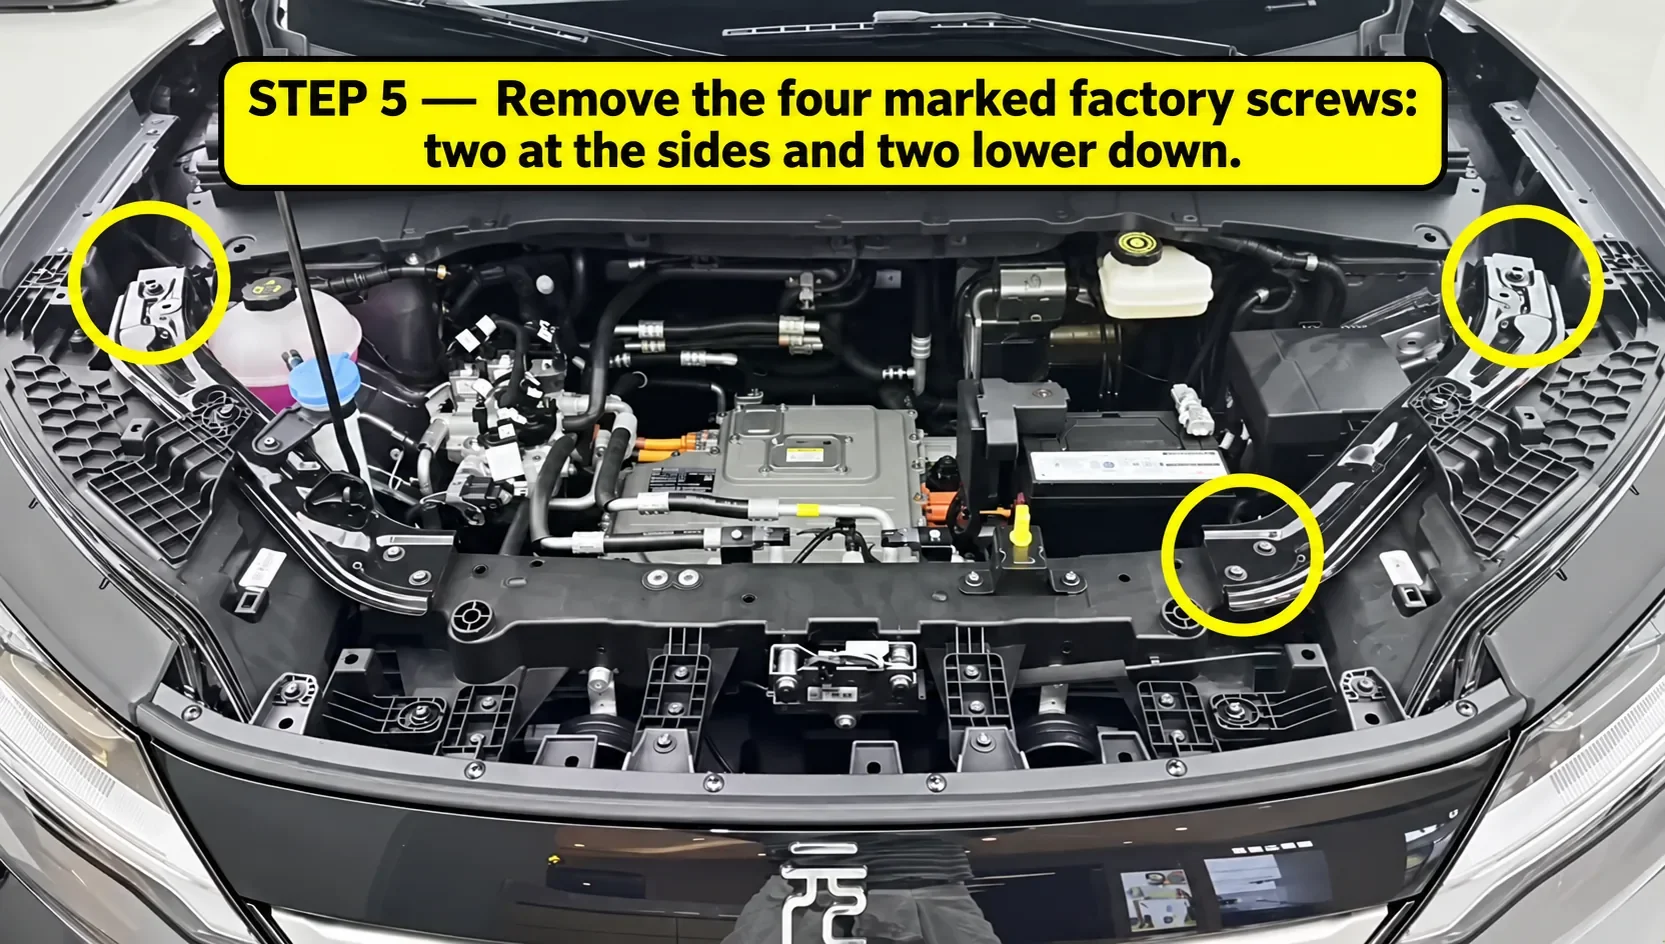
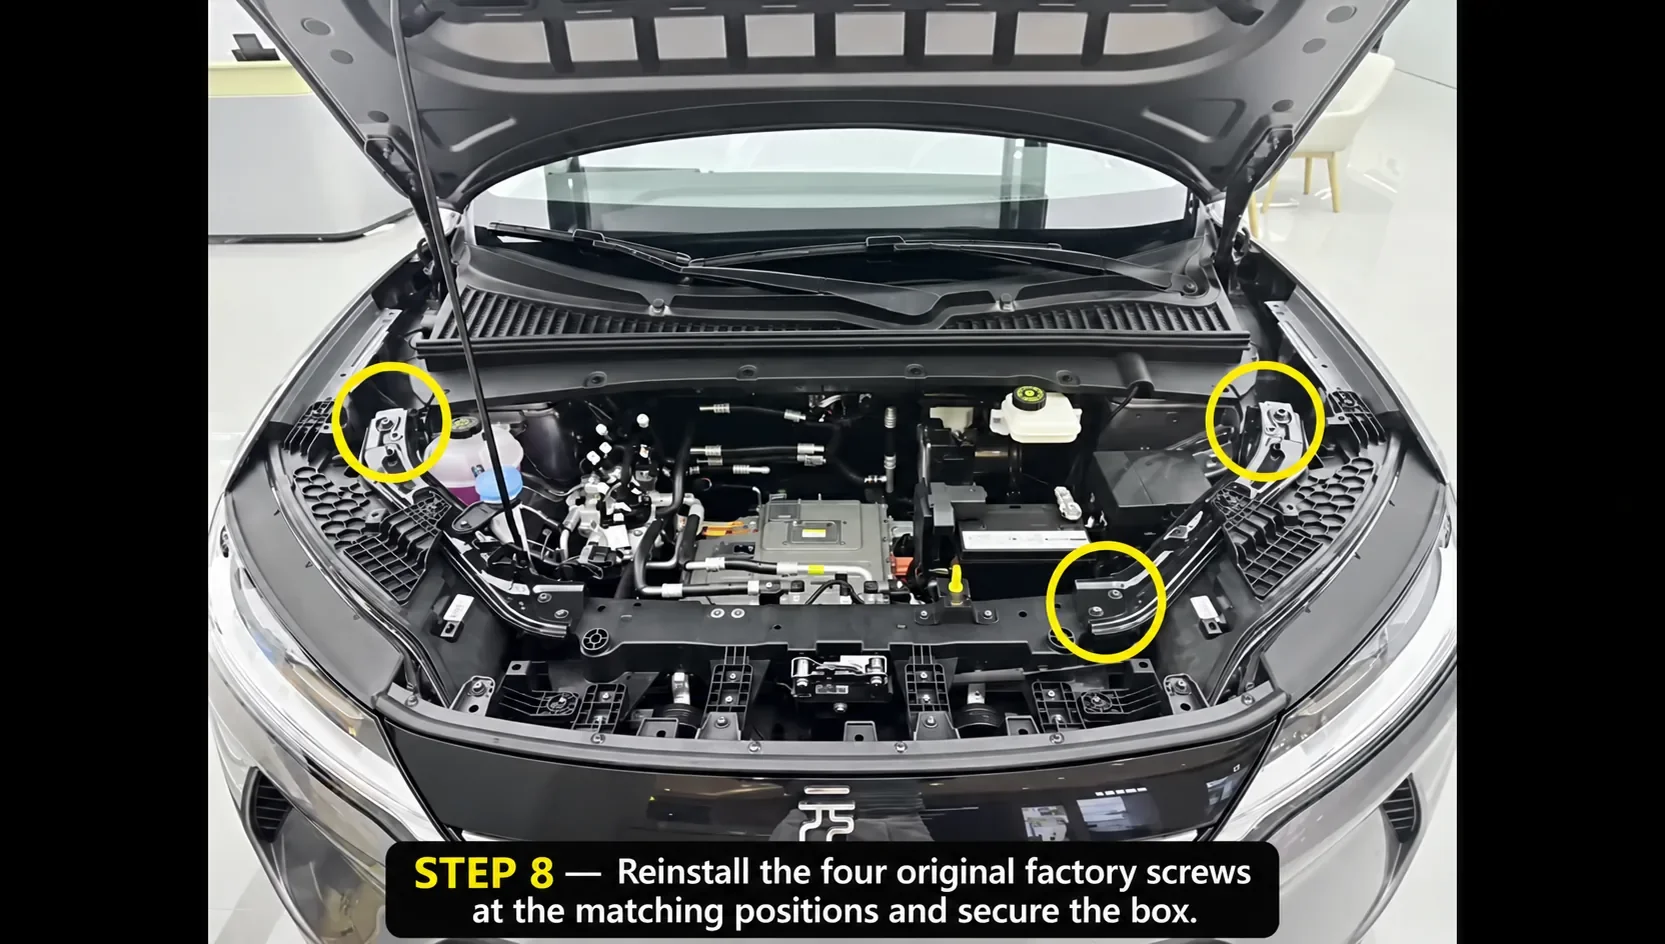
Step 5: Remove the four marked factory screws
Four screws are marked in the photo: two towards the sides and two lower down. Remove only these four and keep them in a separate tray, because they go back in at Step 8. If your car shows a different screw count or pattern, stop and send us photos rather than removing anything else.
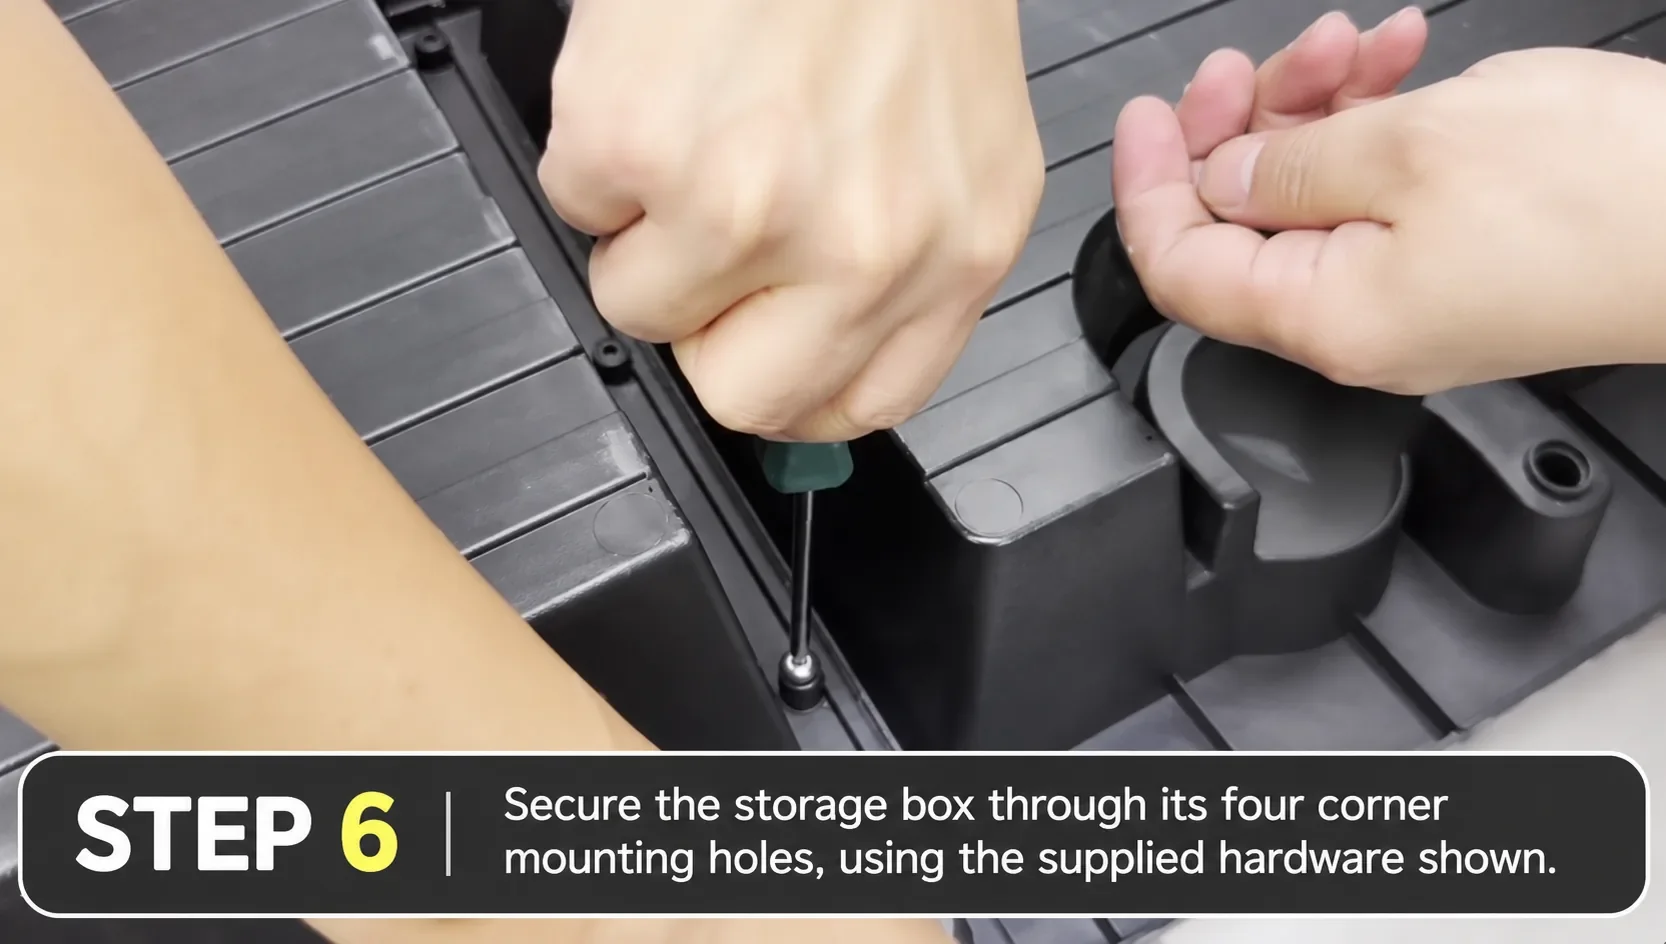
Step 6: Start the box’s corner fasteners
Use the hardware supplied with the box to start the fasteners through its four corner mounting holes. Keep each screw square to its hole and turn the first few threads by hand. Leave them slightly loose until the box is seated and lined up. Tightening one corner fully too early can pull the other mounting points out of line.
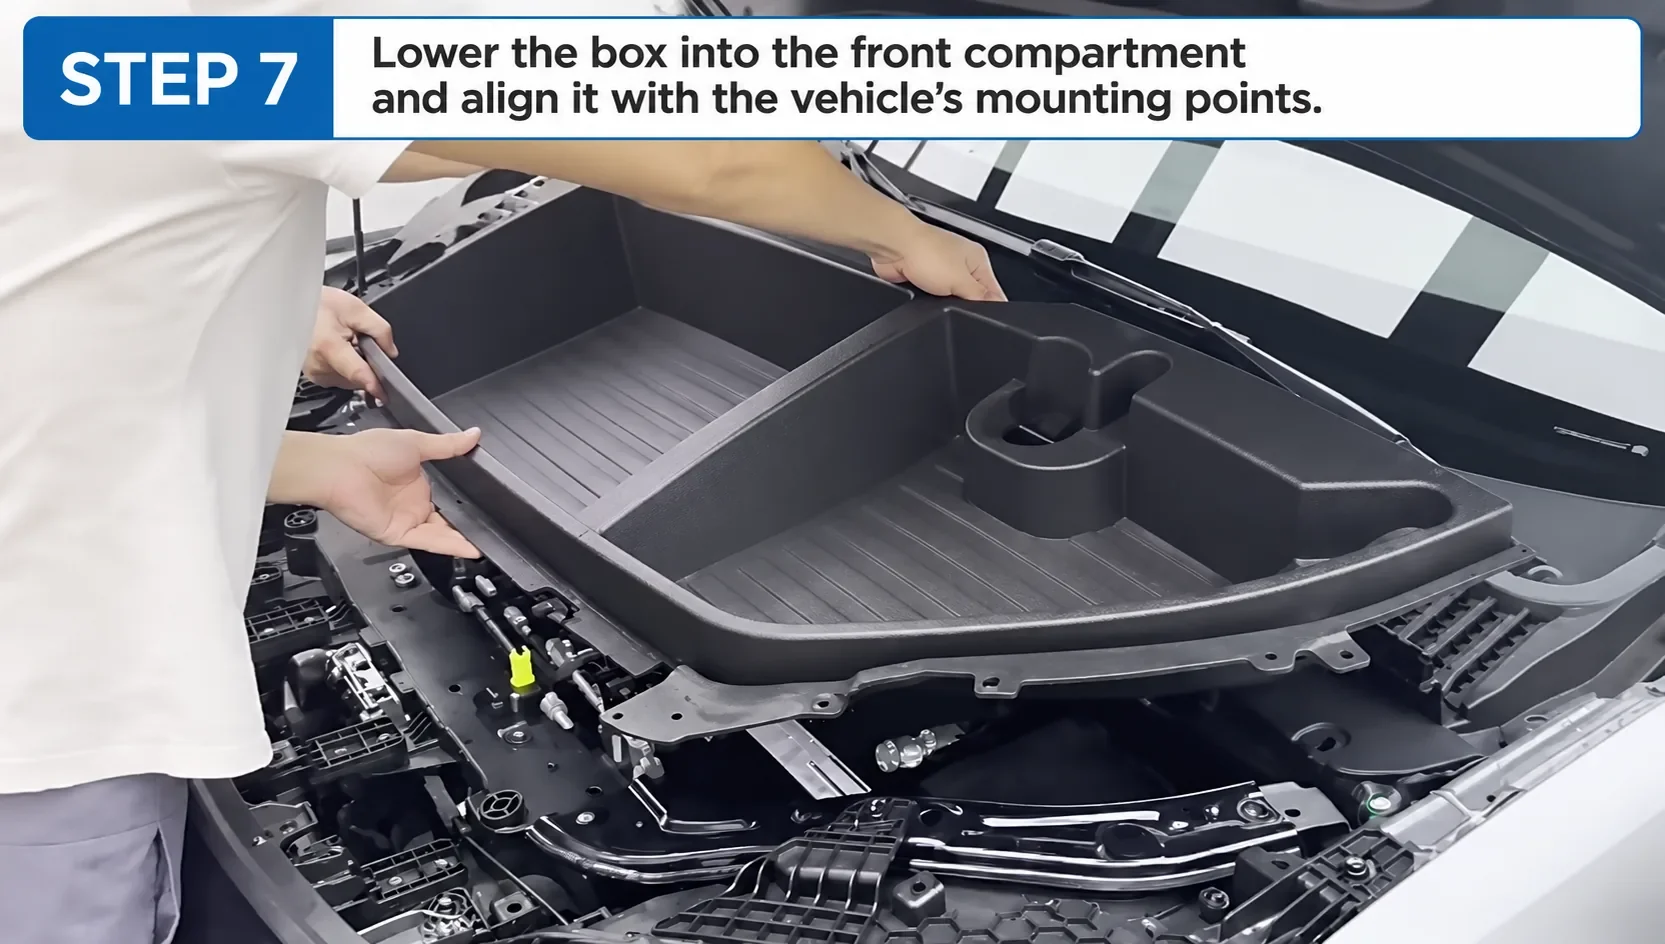
Step 7: Lower the box into the front compartment
Lower the box in without dragging it over the surrounding trim. Line up its moulded edges and mounting points with the car. It should sit flat and should not press on hoses, wiring or caps. If it rocks or needs force, lift it out and check its orientation.
Step 8: Refit the four original factory screws
Put the four original screws back in the positions you took them from. Start all four before tightening any, then tighten evenly to a firm fit. Plastic mounting points can crack, so do not overtighten. Use any different hardware or tightening instructions that came with your box.
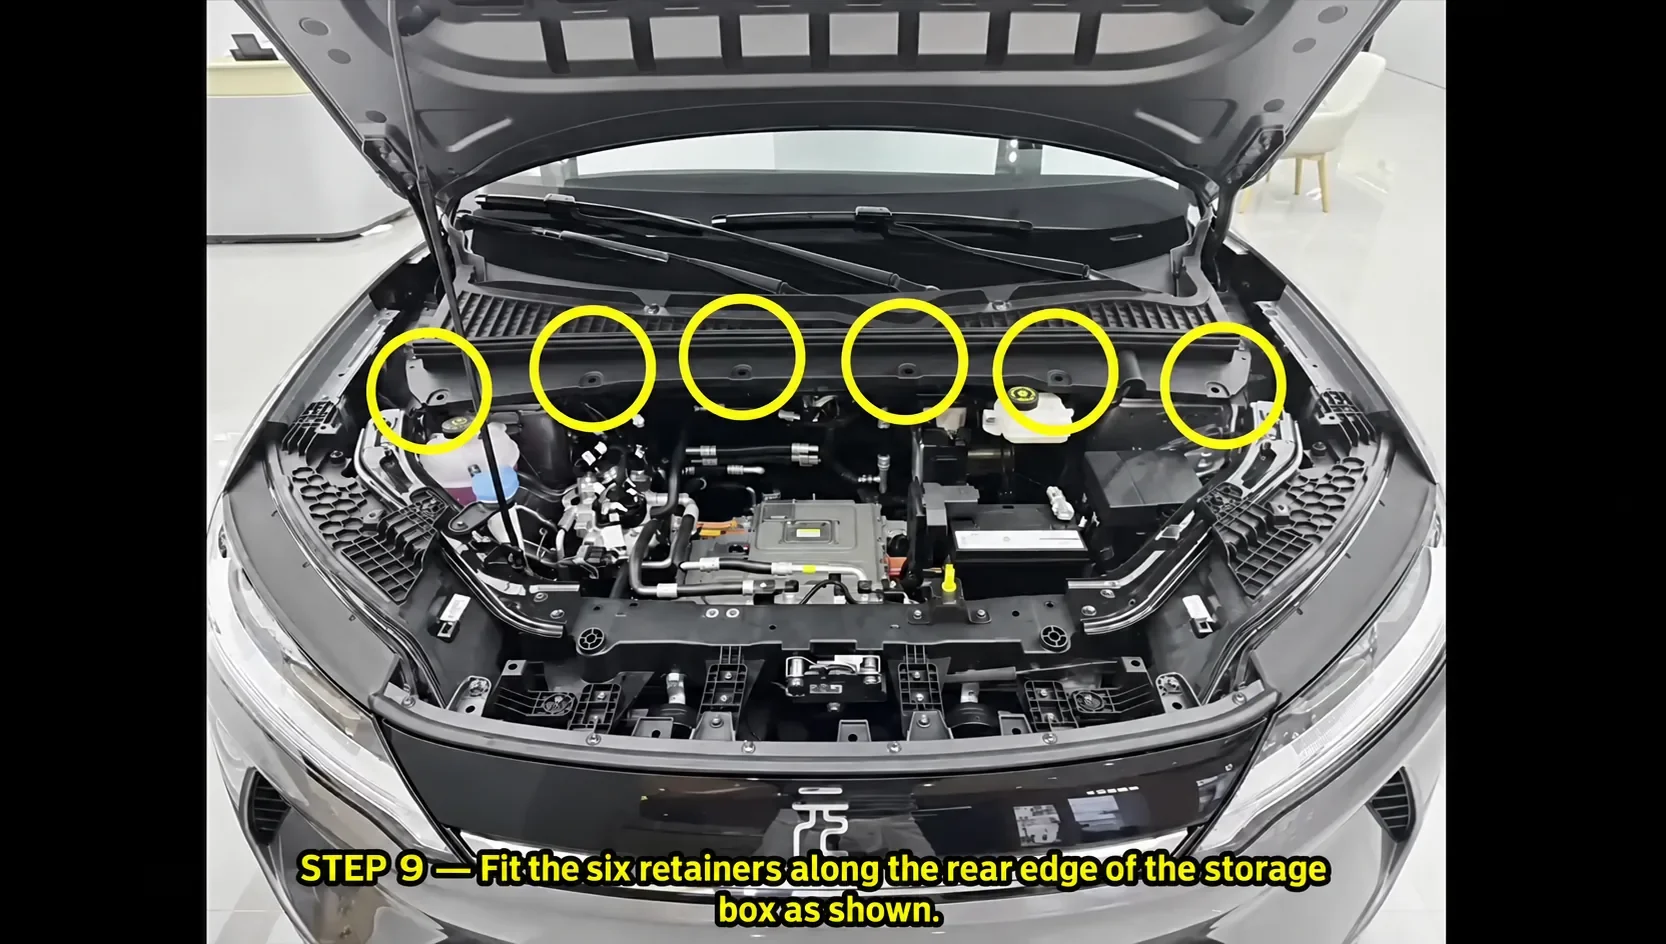
Step 9: Refit the six rear retainers
Press the six retainers into their positions along the rear edge of the box or cover, following the layout in the photo. Each should sit flush and hold without rocking. A retainer that will not seat may be misaligned, damaged or the wrong type, so take it out and check instead of forcing it.
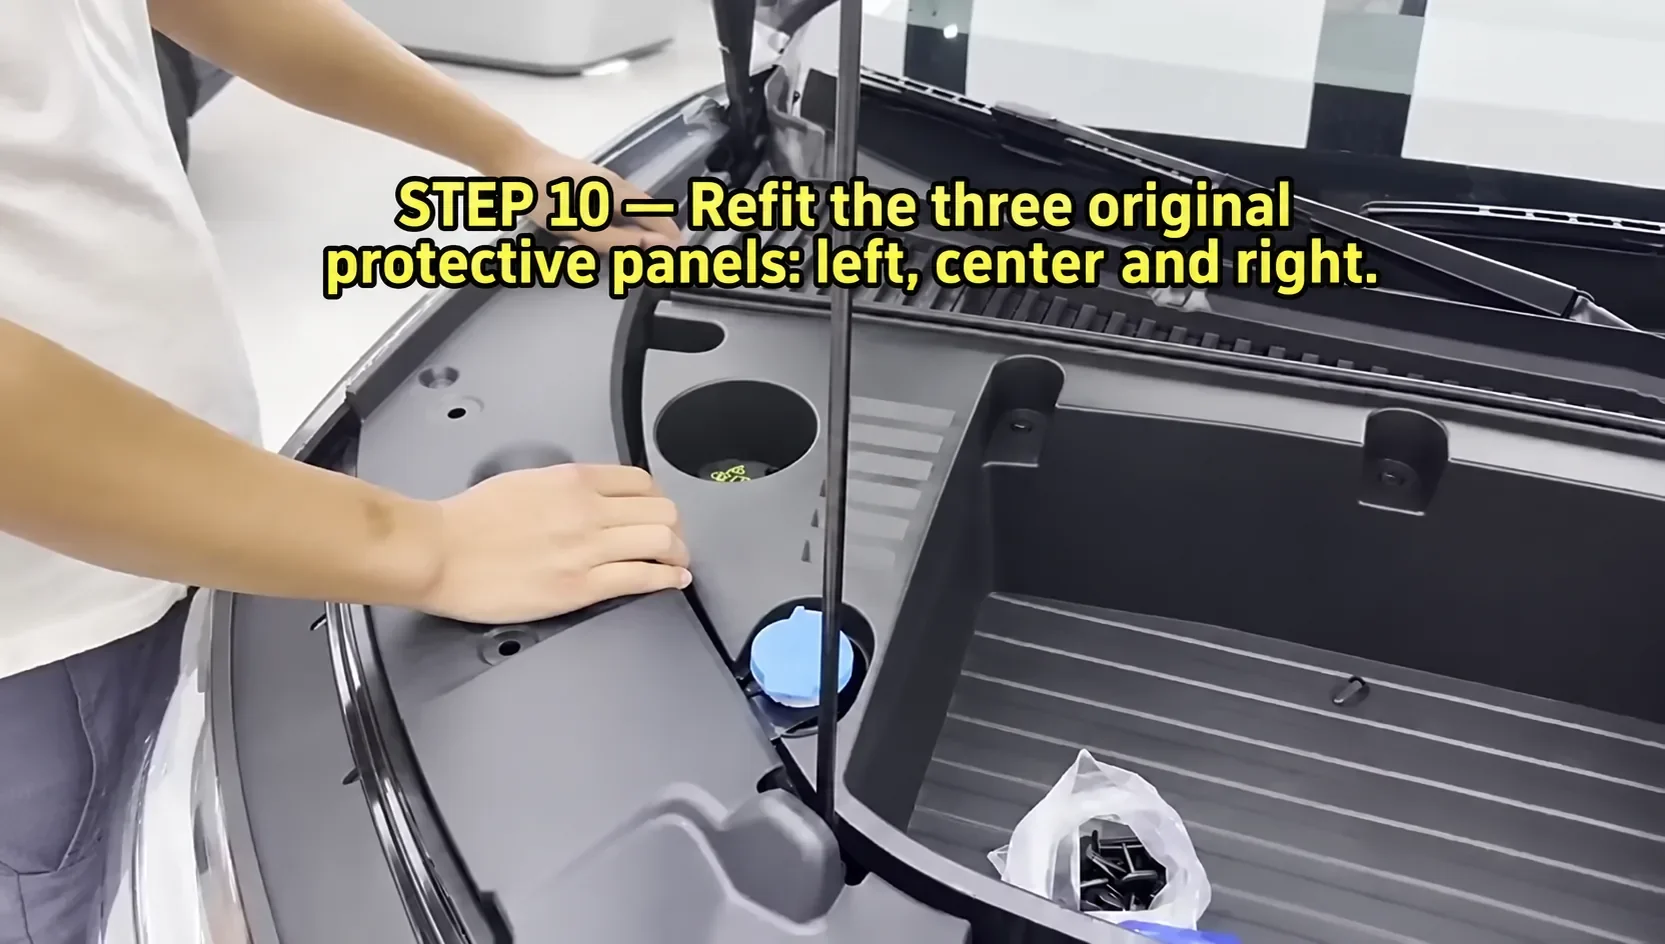
Step 10: Refit the three protective panels
Put the left, centre and right panels back. Line up their tabs first, then press the clips home with even pressure. Refit the rear cover retainers removed in Step 1 if your box design uses that cover. Check every panel edge for a flush fit and make sure no clip or screw is left over.
Check After Installation
Before you close the bonnet, take a minute to go round the whole box.
- Look around the full edge of the box and confirm it sits flat.
- Check that the original and supplied fasteners are all in their intended places.
- Make sure every panel is secure and flush, with no clip or screw left over.
- Check that no wire, hose, cap or service point is trapped or blocked.
- Remove every loose tool and fastener from the compartment.
- Close the bonnet as described in the owner’s manual, then reopen it and check that nothing has moved.
Do not load the box until it is secure and the front compartment closes normally.
Troubleshooting
The box rocks or does not sit flat
Lift it out and check its orientation, then look for a leftover clip, a misplaced screw or trim that has not been fully removed. If it needs force to line up, do not press harder. Send us a photo and we will help.
Something rattles
Start with the clips and retainers. A retainer that is not flush or a panel with a loose tab is the usual suspect. Re-seat each one with even pressure, and make sure all four factory screws are tightened evenly.
The bonnet does not close properly
Stop closing it. Reopen it and look for a panel edge standing proud, a screw not fully seated, or the box pressing on something around it. Fix that before trying again, and keep any bag or cable inside the box so it cannot catch.
A clip will not seat or has broken
Do not force it. Take it out and check that it is the right type and in the right place. If it is cracked or deformed, replace it.
Where do the cables go?
Coil the charging cable and keep it inside the box so that it does not trail over the edges or sit against the surrounding parts. Dividers help keep the cable separate from cleaning items and the emergency kit.
BYD Atto 2 Frunk Installation FAQ
Do I need to drill anything?
No drilling is shown. The box is fixed with the supplied hardware at its four corner mounting holes, and the four original factory screws are removed and refitted.
Can I remove the box later?
Yes. The box is removable, for example when the front compartment needs servicing. Reverse the steps above.
Can a workshop fit it for me?
Yes. The steps use ordinary trim tools and screws, so a workshop or accessory shop can fit it, and we can send this guide for your fitter to follow.
Does this guide apply to a right-hand-drive Atto 2?
The box and the steps shown are for left-hand-drive cars. If you have an RHD Atto 2, contact us and tell us your country.
Get the Atto 2 Frunk Box
For your own car: see the BYD Yuan Up / ATTO 2 LHD frunk storage box. One set to Spain costs around €100 door to door, tax and shipping included. Shipping to other destinations varies, so contact us for a quote to your address.
For shops and online sellers: order one sample at least 20% below retail, or ask about dropshipping. For volume orders with tiered pricing, see our BYD exterior accessories wholesale page.


 English
 Portuguese
 French
 Turkish
 Russian
 Arabic
 Spanish